Similarities in Making Both Skins
Making a dome like shape to broadly fit
over the laser cut object was the initial process in making both my skins. This
is a key step in forming the skin since once the metal approximately covers the
object, you can begin to identify what part need to be brought in,
curve, bulge out, etc.
There are two methods in creating this dome
shape:
First is using the shrinker. This is a time effective way in shrinking
the edges of a circular shape to form a dome.
However, in using this method marks are created
on the surface of the aluminium, as well as causing the aluminium to crease/
crinkle too much. Once this over-shrinking occurs, it is very, very hard to fix.
 |
| Example of over using the shrinker and excessive shrinking occurring to create these creases in the aluminium. |
These marks can be rid of to a certain
degree using the English Wheel, however it may not completely remove the marks
and therefore the aesthetic quality of the skin maybe compromised.
Second method is using hand shrinking. Using the tree stump to create ripples in
the aluminium’s edges and shrinking by folding the aluminium into itself is
another method for shrinking to create a dome.
Important Tip: Once these ripples are
created using the tree stump, they must flattened out to be be tucked/ folded into each other and hence the shrinking occur. This is done using the leather sandbag and nylon bossing mallet and it is key that when hammering to hold the aluminium at and angle so that the shrink is made without flattening the dome.
It is also important to focus on stretching the centre of the shape, rather than the outer edges (as highlighted below).
Although this takes up more time than using
the shrinker, the shrinker marks are not left on the aluminium’s surface and
overshrinking can be avoided.
Once loose dome/ semi-sphere shape is
created to approximately fit over shape. It is now easily visible what parts
need to be cut out and areas need to be shaped.
PROCESS IN CREATING THE SKINS
Discipline Related Skin
 |
| Shrink using the tree stump, the ripple like shape at the edge of the circle replicate the folds and tucks of the shrinker. |
 |
| Stretch the middle part of the circle using the sandbag and nylon bossing mallet. The process of shrinking the edge and stretching the inner part continued until it remotely resembles a dome shape. |
Interdisciplinary Shape
 |
| Begin by stretching the centre of the circular piece of aluminium on the leather sandbag to approximate a dome like shape to loosely fit over the object. |
 |
| Once it roughly fit over the laser cut object, the curving of different edges are marked out and refined wth a wedged hardwood timber mallet over the steel mushroom dolly. |


 |
It is visible that the skin basically covers the object however the skin does not sit closely, as apparent in the photos. The edge of the skin doesn't lie on the surface of the object and needs to be brought in and shrunk further to fit the rock shape.
 |
| In order to create a skin that closely replicated the surface of the shape, further marks need to be made in accordance with the laser cut object. |
 |
| Once the areas which need to curve inwards more, fall more steeply at the edge and small irregular areas where the shape dented are marked out, adjustment the shape using the wooden stake dolly with a curved top surface (which was made by peter). The wedged hardwood timber mallet is used to shrink down the areas gradually to bring in the shape more and the flat end of the hardwood timber mallet used to smooth out the curves. |
 |
| It is clear that the skin sit more closely and the slight irregularities in the curving of the rock's surface should be able to be mimicked. The general shape the object is now complete and further changes around the edge of the skin needs to be made and brought in more, so that it can sit flush against the surface of the object. |
|
Discipline Related Skin
Regularity and symmetry mean that
understanding how one side was made the process could be repeated on the other
side.There were pros and cons to this as the
process of replication as it was hard to create a mirror image form, whilst
understanding what had to be done sometimes sped up the process of repeating on
the other side.
The base of the ‘vase’ like shape was
fairly simple and straightforward to make. Starting off as a approximate dome
shape and curving the sides in to mimic the slightly ‘squashed’ dome shape.
The ‘neck’ part is where forming this skin
got very difficult, the reverse curve along with the narrow nature of the neck
area provided the greatest challenges.
Was unable to use the shrinker/ stretcher on this
part as it was difficult to fit into the stretcher and when I did
manage to use the stretcher on this area it tore through the aluminium (as seen below).
Therefore the shrinking and stretching of
this reverse curve had to be done by hand, by hitting the centre of the neck area at an angle
against the tapered steel T-dolly and the curved steel dolly, hence shrinking by folding the aluminium into itself.


Interdisciplinary Skin
This object of the rock provided a challenge, as it is a very organic shape that has no symmetry or structure to its form, as one side is different to the other unlike the 'vase' shape.
This made it difficult to assume the shape of the curves without constantly comparing against the laser cut object. It also made it hard to determine where the skin lay on the object and in order to resolve this issue marks where made on the skin and the objet so that where these marks line up to be the position of the skin.
All sides of the shape being different, also meant that different dollys and tools that fit the form on the skin had to be constantly found, so that the desired shaping of the particular area would occur without deforming other areas. Along with steel dollys, wooden stake dolly where customised in order to fit the skin.
DIFFERENT TOOLS AND USES
Steel Planishing Hammer
Not used to shape or form the metal skin but rather, to polish the surface and smooth out the surface once the form of skin is complete. If using the steel planishing hammer to shrink the aluminium against a dolly, marks and dents on the surface of aluminium will most likely be left as metal on metal leaves marks (as seen below). This can be
hard to remove later, even with a planishing hammer and therefore should avoided, using the correct tool can save time and effort.
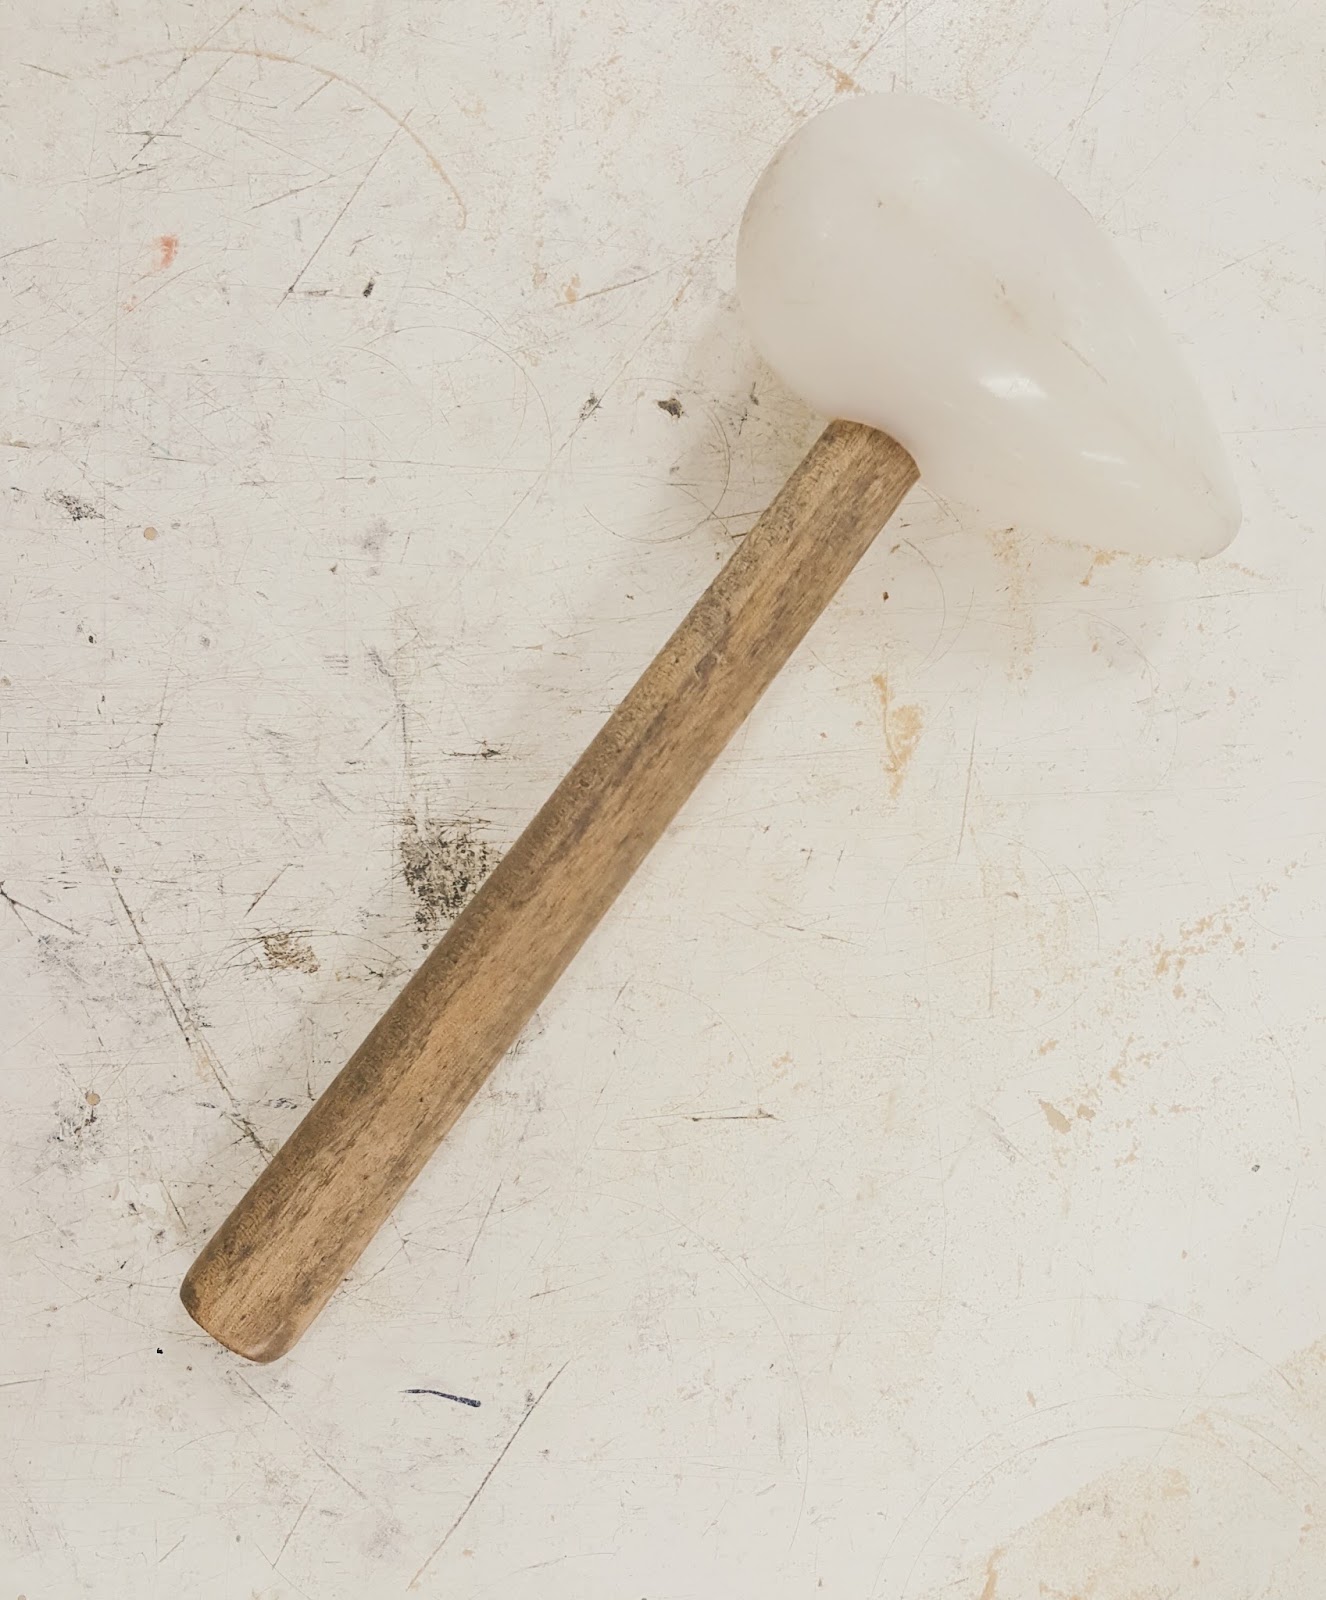
Nylon Mallet
Nylon Bossing Mallet
Used to stretch by hammering onto the leather sandbag. The sharpness of the point determines the extent of stretching.
Nylon Mallet with Flat Ends
Flattens out surfaces without stretching the aluminium.
Nylon Mallet with Edge.
This was a tool customised by Peter, it was initially a Nylon Mallet with Flat Ends (as seen above), however one side of it was cut away to create this edge. It has the same use as the wedged hardwood timber mallet, used to shrink the aluminium by hammering it against the dolly. However I personally preferred using the wedged hardwood timber mallet.
These nylon mallets can also leave marks
on the aluminium skin however these are more easily removed using a steel planishing
hammer.
Hardwood Timber Mallet
Leaves virtually no marks on the aluminium.The wedged hardwood timber mallet was useful when shrinking aluminium to form a curve by slowing bringing the shape it. It was the mallet most predominately used.
Important Tip: It is crucial to start from the top (1) moving along the edge/ ridge where you want to bring it down form (like the lines drawn on the photo) and slowly move down to the edge of the shape (moving down to 2 then 3). This is key in shrinking the aluminium, by shrinking it into itself and forming the desired shape.
FINISHES
Steel Planishing Hammer
Leaves dimple like marks on the surface of the aluminium and used to remove and marks left in the skin from previously forming the shape. Start with larger dimple marks and refined into smaller marks until this texture covers the entire surface of the skin.
Important Tip: Lightly tap on the skin to ensure the skin is not deformed, only polishing and refining the surface, not changing the shape.
English Wheel
Other than uses for stretching, when it is
loosened, it can be used to smooth out lumps.This gives glossy, mirror like finish to the surface of the aluminium.


Turpentine and Brasso
When creating the interdisciplinary skin, now having once experienced metal shaping I was able to consider the finishes of my skin more. Therefore after finishing planishing the surface of the aluminium, Turpentine and Brasso were used to polish the aluminium skin.
In polishing using this method, Brasso is dabbed onto a cloth and using this cloth, rub the surface of the aluminium. Once blackness appears over the skin, use another cloth soaked in turps to remove this. When the skin is again clear, rub with the Brasso until the blackness appears again, repeat cleaning with turps and continue repeating this process until no blackness appears.
Other options of polishing include using sandpaper, beginning with a coarser grade and refining down too a super fine grade, if not, something as fine as a piece of leather, which causes the finest of abrasions.